Oh to be a Cat.
Sunday, June 30, 2013

Thursday, June 27, 2013
Portraits by LaVera
I thought it was time to show some of my paintings. Here are two portraits I've done. They are very different from each other that's why I chose to show them together.


Tuesday, June 25, 2013


Sunday, June 23, 2013
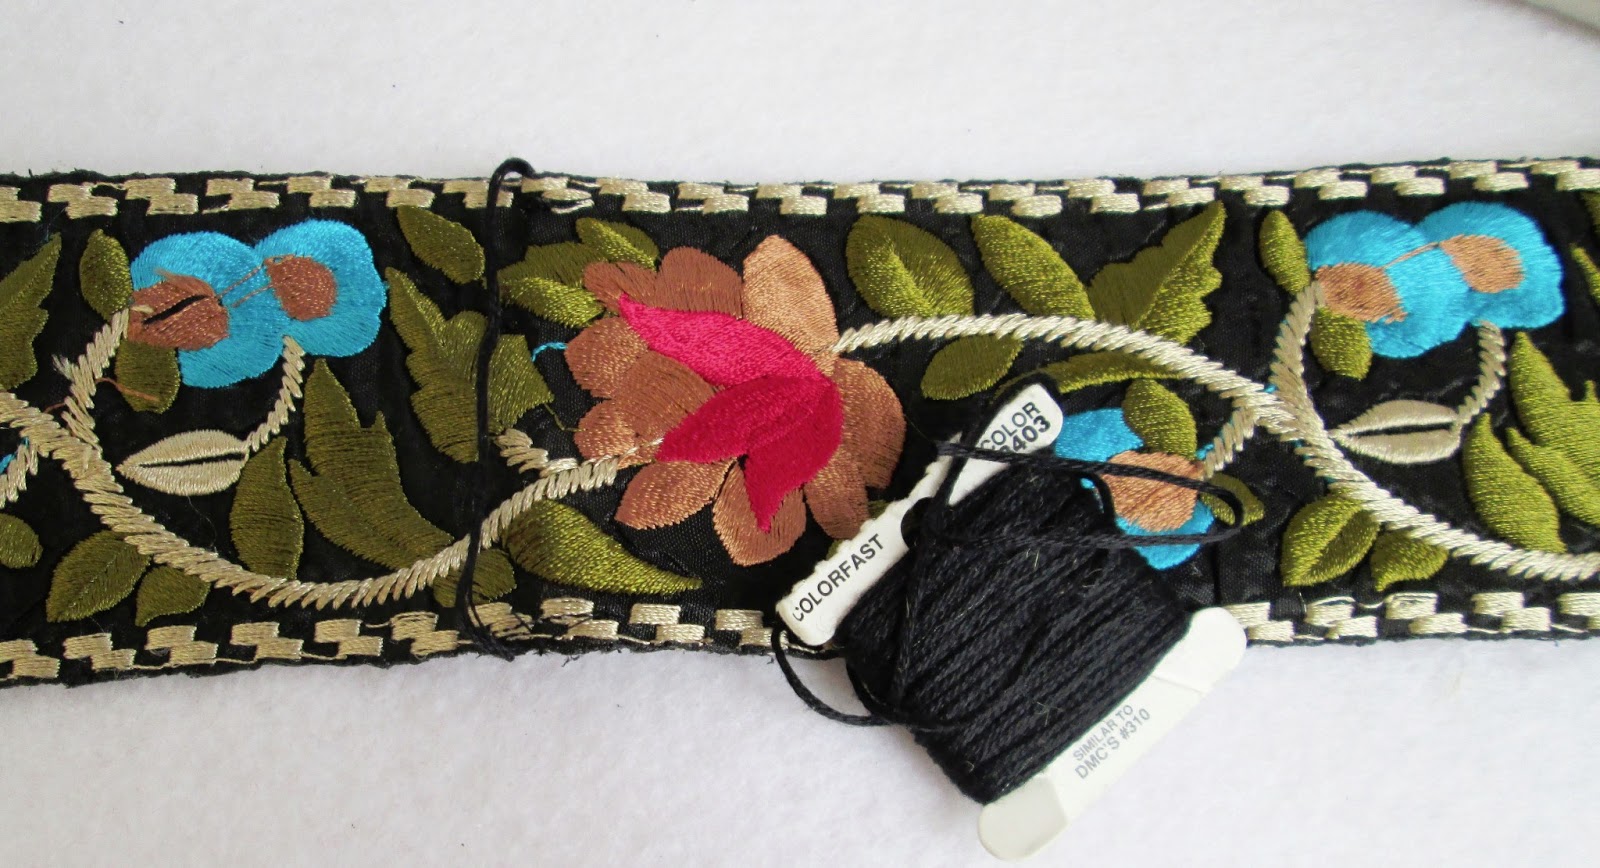
Craft: Beautiful Ribbon Belts
In the April 2013 Paris Vogue I found these beautiful ribbon
belts. So let’s make some. These will
also make great gifts.

Supplies you’ll need:
Jacquard ribbon: your waist size plus 12 inches. (You can
find jacquard ribbon online or at your local fabric store.)
Belt buckle: chose a size your chosen ribbon will fit
through. (I Found two of mine at an antique store and the third at a Fabric
store) Look around your house for an old belt and cut the buckle off or at a
garage sale and then pick a ribbon that will work.)
Access to a sewing machine
Thread to match your ribbon
Grommets to match the buckle you chose and Grommet tool (you
can get these at your local fabric store.) But try to borrow the grommet tool
they’re expensive.)
Embroidery Thread to match ribbon


To make the turquoise belt with the modern belt buckle: I
bought the buckle at Joanne’s fabric store and found the ribbon at an out door
market. (This belt you should only make if your weight does not fluctuate much
because it’s only one size)

1) Slide your ribbon through one side and pull enough ribbon
through the loop until you can sew it on. Now sew it in place. (I did two rows
of stitching.) See photo.
2) Slide the other belt piece onto the ribbon then fit it on
your self sitting down with clothes on. Pull the ribbon to fit, then pin in
place.

3) Stitch in place.

4) Cut off excess. If your ribbon is the kind that unravels
place a little white fabric glue along the unfinished ends to keep them from
unraveling.

Black Belt and Old Buckle
I found this Buckle at an antique mall and the ribbon at an
outdoor market.

1) Measure the length of ribbon you will need to pull
through your buckle in order to sew it on. (See photo)

2) Mark a hole where the belt buckle prong should come
though. Make a hole. I used a small hole punch but you can use a nail. After
making the hole place a little white fabric glue around the edges in order to
keep the fabric from fraying. (See photo)
3) Now put the ribbon through the buckle and place prong
through the hole.

4) Stitch ribbon in place.
5) Try on your belt and decide on the placements for your grommets.
I put my first grommet at my waist size and added three more an inch apart. Make
sure they are in the middle of the ribbon. (see photo)

6) With the hole punch (the hole must be smaller than the
grommet so that the grommet can grab the sides of the fabric.) punch holes in
the places you marked. Push the grommet through with the right side of the
grommet (the flat side is the right side) on the right side of the ribbon.

7) Use your grommet tool with the pointy side going into the
tube side of the grommet and squeeze your tool. (This will bend the grommet and
hold it in place.) You will not be able to remove the grommet so do a couple of
tests first.)

8) Finish the end of your ribbon by folding it over a 1/4”
and then a 1/4” again and stitch it in place.
9) Final step take a piece of embroidery thread knot the end
and sew it on to the back of your belt. (This is so that the excess of your
ribbon belt can be placed through it and it won’t hang down.) Now loosely pull
it across the front of your belt and knot the embroidery on the other side and
stitch to the back of the ribbon.


For the pink belt: do the same process as the black belt.

Friday, June 21, 2013
Hats, Hats and More Hats
I love hats I wish more people would wear them it is really fun. I was lucky enough to be invited to a wedding in Scotland where it is expected that you wear a hat. It made me feel very special.

Stephen Jones makes the greatest hats. Here's a little about him.
Stephen Jones born 31 May 1957 is a leading British
milliner based in London ,
who is considered one of the world's most radical and important milliners of
the late 20th and early 21st centuries. He is also one of the most
prolific, having created hats for the catwalk shows
of many leading couturiers and fashion designers, such as John
Galliano at Dior and Vivienne
Westwood. His
work is known for its inventiveness.
And here's some great hats.


 |
| Click on this photo to go to Stephen Jones website. |
This is a wonderful video it shows a lot fun hats.
Hats: An Anthology by Stephan Jones for London's Victoria and Albert Museum.
Have a great day. Maybe wear a hat!
Tuesday, June 18, 2013
Seeing I People (This is Funny)
If you've ever run into something or someone while you're texting
You will appreciate this.
Have a Great Day ! Full of Laughs and smiles!
A lot of email subscribers to my blog are asking me how to leave comments.
Here's how scroll up to the top of the email and click on the blog title that will take you to my blog.
Then scroll down to the bottom of the blog and see the comment box. Type in your comment.
Now click on publish.
That's all you have to do. I LOVE comments they let me know you're out there.
Sunday, June 16, 2013
A Fashion Tea: How to Decorate the Table
Fashion Themed Tea
a five part series
a five part series
Planning for a Tea June 5th 2013
Making Theme Related Plates June 8th 2013
Making of Fashion Themed Cookies June 11th 2013
Marzipan Shoes June 13th 2013
Decorating the table June 16th 2013

So that’s where I started.

I collected magazines and looked at what
was in them: what colors were prominent and what ideas could I find that would
relate to a tea party.


Now came the fun finishing touches.
The dress shaped cookies and Marzipan shoes on each plate. Voila!…the table was
done.
 |
| Dress Cookies |
 |
| Earring Cookies |
 |
| Pattern Piece Cookies |
 |
| Marzipan Shoes |
Thursday, June 13, 2013
Marzipan Shoes
Fashion Themed
Tea
a five part series
a five part series
Planning for a Tea June
5th 2013
Making Theme Related Plates June
8th 2013
Making of Fashion Themed Cookies June
11th 2013
Marzipan Shoes June 13th 2013
Decorating the table June
16th 2013
You can find Marzipan at your local grocery store. If you're are really lucky you can buy fresh Marzipan at a bakery near you. That's where I get mine. I did find some online but I haven't tested it so if you buy it please let me know how it is. I included the ad link. It was rated 5 stars.


Step 4: When adding designs just make the shapes and stick them onto the shoe then press them in so that they look smooth.

Step 5: I used royal icing to hold the shoes to the doilies.

Step 6: Then cut out a bright pink circle and placed it under the doily.

Step 7: Wrap your shoe in cellophane wrap.

Step 8: Tie it with a bow.

Subscribe to:
Comments (Atom)