Wednesday, October 23, 2013

Craft: Memories of Ice


I recently taught a class at the Whatcom Museum. It was a fun collage class. The theme was “Memories of Ice". 


First we filled the room with lots of supplies. The base items we used were colored tissue paper on mat board (make sure if you use colored tissue paper that you get the kind that doesn't bleed). We used watered down white glue to glue the tissue down. To glue down the heavier items we used non watered down glue.


                    We also had lots of picture from books and Magazines. 


Felt pens and Yarn.


Aluminum tape and Styrofoam, I use an electric knife to cut the Styrofoam.


I made examples of techniques you could use but there were no rules as it was just for fun.


Here I used all tissue paper. To get the texture I twisted the tissue paper. 


This one I used a photo copy of a fish, tissue paper, yarn, and a tiny accent of Aluminum tape.


On this one I first glued some Styrofoam to my mat board then I glued my fish on. 
Next I covered everything with different color tissues. 


Here I started by drawing on my mat board then I layered fish and tissue on top of  the drawing. When you layer your tissue you need to start from the darkest color on the bottom and work your way up to the lightest color on the top. I also redrew part of the under drawing on the top when my glue dried in order to add a warm color and more texture.


On this one I glued a layer of blue tissue onto my mat board. Then the Styrofoam pieces over the tissue.
After that I added more tissue then clear glitter.


Here are two participants with there projects. 


It was a fun night. 

For information on more classes by me or other artists please click on the link below.


Saturday, October 19, 2013

The Steps of a Flower Painting


I was asked to paint a 6" X 8" painting for the 20th anniversary of the Lucia Douglas Gallery. They're having a show called Postcards of Fairhaven. I thought it would be fun to show you the steps I took. 


First I used a gesso that I had added a green to. I coated and sanded the canvas twice. Then I transferred my sketch to the canvas.

                                                            
                                          Then I painted the background.

                                                I then painted the vase,


                                        and added the bright white high lights.


Next I started on the Flowers.

 Sometimes I paint in all the colors and just keep layering, but this time I painted each flower separately.


             Now I added some of the yellow flowers. I also used the yellow for highlights. I usually change some things as I go so my painting is never exactly the same as my photo.


When I work on each flower I use many colors I look at each flower carefully and when I want to use shadows I try to use the colors compliment.


Flower Bouquet by LaVera


When I feel like I'm done with a painting I set it in my kitchen and look at it for several days. This process helps me see what I've missed and what needs to be changed. I never sign my painting until I feel done. 


Wednesday, October 16, 2013

The Sketchbook Project

Last year I did the a fun thing I joined The Sketchbook project. I paid $25.00 and the project sent me a sketchbook. I drew in it and did some collages. Then I sent it back. Now my sketchbook travels to different cities and as it travels when someone checks it out I get an email saying someone looked at your book and in what city they did. After a year of travel it will go to its final resting place: The Brooklyn Library. 

To see inside my sketchbook please click on the image below. 


I
 To learn how to make your own sketchbook click on the link below. 
This would also make a fun Christmas present for an artist.


Just a note: if you don't know I have a website where I keep a lot of my blog projects and ideas some new and some in more detail please click on the button below. The button is always kept on the upper right side of my blog if you want to get to my website it may be easier to find old craft projects there.


Saturday, October 12, 2013

My Garden in the Fall

I love my garden in the fall. It has the sweet smell of the end of the summer:  a mix of hot leaves and fruit. 


The air is warm in the day and quickly turns cold in the evenings. 


I like to enjoy the last moments of summer having tea on my deck before the rains begin.


On an arbor over my table the grapes are beginning to sweeten as they turn red to signal they are ready to be eaten. 


Leaves dress in their fall colors. 


And the last of the flowers rush to open.


The hydrangeas are making their final color change. 

From white to pink

or white to green. 


Spiders are everywhere.


The apples are almost ready.


The Asters are in full bloom.


The beautiful blue sky enhances every color.


My neighbor has said that my hops are almost ready to be harvested. He plans to make some of his wonderful beer with them. 


I will enjoy the last of its beauty which will give me the strength to do the heavy fall clean up.  


Wednesday, October 9, 2013

Halloween Invite

I drew this invite just for you my very special blog followers: Thank you.


Free Downloadable Halloween Invite 

          Happy Halloween!!!

Saturday, October 5, 2013

Craft: Ghostly lights for Halloween!

Here’s a fun way to light your table for Halloween dinner.

The supplies you’ll need:
1) Foil wrap
2) White cloth
3) White glue or starch
4) Thread
5) Black Sharpie
6) Battery operated tea light candles

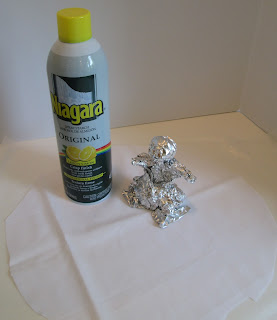
1) Mold the Foil wrap into a ghost shape about 5” high. Start with a ball.


Then mold the body around it.


    2) Then cut a piece of white fabric into a 10” circle.


3) a. If you use white glue you will need to mix it with water until its consistency is like maple syrup then dip your fabric circle into the glue until it is wet.
Halloween Ghostly lights 

      b. If you use the starch spray your fabric circle until it is really wet.

Halloween Craft: Ghostly lights

4) Now mold your fabric over the foil ghost and tie the thread around the ghost neck and then around each arm to hold the fabric in place while it dries.


 Halloween Craft: Ghostly lights

5) Once your ghost has completely dried draw on a face with a black sharpie.


6) Now cut the threads off and remove the foil from inside.

Halloween Craft: Ghostly lights


7) Place your ghost over a battery operated tea candle.


Tuesday, October 1, 2013

Printemps Paris

Printemps department store is a corner stone of Paris fashion. It is always on the cutting edge of what is going on in the fashion world. 

 I thought you might like to know what they are saying about this season's trends and remember their forecast is usually a season ahead of ours so you'll be a fashion leader.  :) 


                             AUTUMN/WINTER 2013 TRENDS

Rock, Punk and Grunge


Inspiration from Men's Classics 


 Inspired by Post War Heroines


Related Posts Plugin for WordPress, Blogger...